This guide is here to help you discover some of the hidden gems in Personal Cookbook; features that might not be immediately obvious or easy to find. If you need help finding something or want a more detailed explanation, visit the support page.
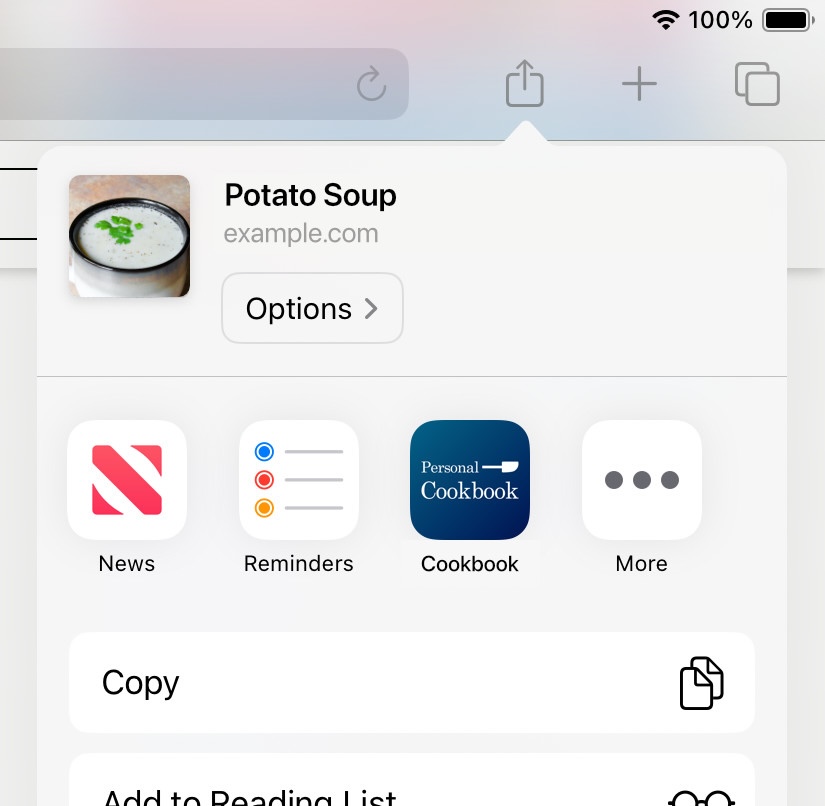
To use the included safari extension (installed automatically), open a webpage in Safari, tap the share button, and select "Cookbook". Personal Cookbook will open, to determine if the recipe may be imported.
Note: If the recipe cannot be fully imported, you may wish to save a blank recipe with the url, since links can be displayed and opened within the app.
Enter an internet address into the 'URL' field, and press the 'Import' button (to the right of the URL field). The webpage will be downloaded and applied to the editor, if possible.
Note: If the recipe cannot be fully imported, you may wish to save a blank recipe with the url, since links can be displayed and opened from within the app.
Personal Cookbook V2 does not save recipes to the cloud. To transfer recipes, use the manual backup feature from V2. To do this, open V2, tap Settings->Backups->Create Backup. After the backup has been created, tap the blue share button next to the backup to save the file. You may then open the backup from this version (Settings->Open), see Opening a backup file topic.
Note: For copying an entire recipe to the clipboard, see the Share topic
Individual recipes, collections, themes, or your entire cookbook, may be saved to a single file, to be opened later, or shared, with the Personal Cookbook app. This may be acheived by using the 'Personal Cookbook file' option, when sharing, using the share icon:

To easily backup your entire cookbook, see the post below.
Backup files may be opened in 'Settings->Open'. You may then select which recipes, collections, smart collections, and/or themes to import. By default, all contents of a backup will be selected for import. You will be prompted if any of the content already exists, and what you would like to do with them.
There are multiple ways to share a recipe in Personal Cookbook.
Tap and hold an ingredient or direction to copy it to the pasteboard. To copy all ingredients or directions, tap the ellipse, next to the 'Ingredients' or 'Directions' headers.
When viewing a recipe, tapping the ellipse, next to the ingredients header, will show options related to the shopping list. You may add all ingredients, or selected ingredients to a shopping list section.
Tap the yield to change yield size of the ingredients. Be careful, this option does not change yield amounts in directions. Only the ingredients will be effected by the conversion.
Tap and hold the 'Recipe' navigation button for a random recipe to be display.
Generally speaking, you may wish to enter ingredients or directions into their own text field. However, entering ingredients, or directions, in this way, can quickly become tedious. The same may be said when pasting each item into it's own field. Hence, the 'Enter List' and 'Paste List' modes.
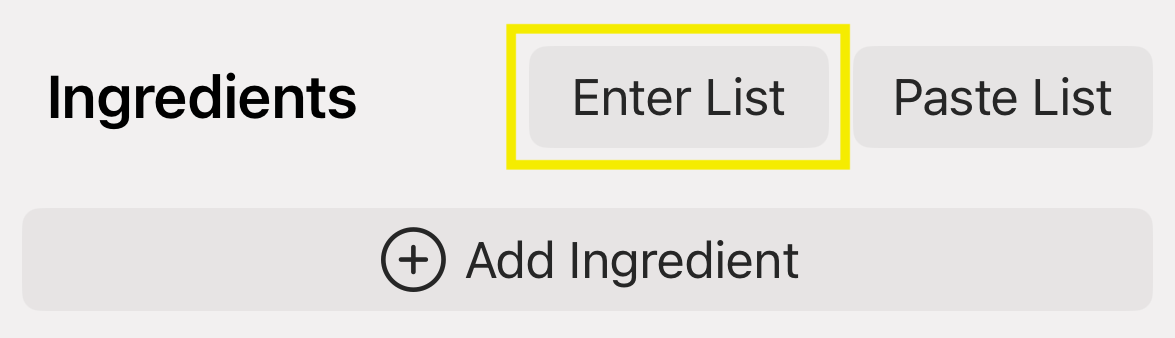
Each item must be typed on a seperate line to be seperated into it's own text field.
i.e. Item 1 Item 2 Item 3
Paste a list from the clipboard. Items must entered as a list, with each new item, on a seperate line.
i.e. Item 1 Item 2 Item 3
Personal Cookbook provides a basic shopping list, with custom sections, sharing (done via email, text message, or plain text). Items may be added individually, or all at once using list mode (see List mode).
The entire list may shared by tapping the ellipse button, in the shopping list's upper right corner, then 'Share…'.
Sections give a great way to categorize your shopping list, be it groceries, stores, store isles, gifts, or anything else you may wish.
To create a section, tap the ellipse button in the upper right corner, then 'New section...'.
Sections may be renamed, moved, or deleted, using the ellipse menu next to each section title.
Sometimes entering items one at a time can be time consuming. List mode attempts to solve this issue, by allowing entries quickly and efficiently, while still allowing items to moved, or checked later.
List mode can be found next to a section title by tapping the ellipse button, the 'Enter list...'.
For items to appear in seperate fields, they must be entered as a list, with each item, on a seperate line.
i.e. Item 1 Item 2 Item 3
Paste a list from the clipboard.
For items to appear on seperate lines, they must be entered as a list, with each item, on a seperate line.
i.e. Item 1 Item 2 Item 3
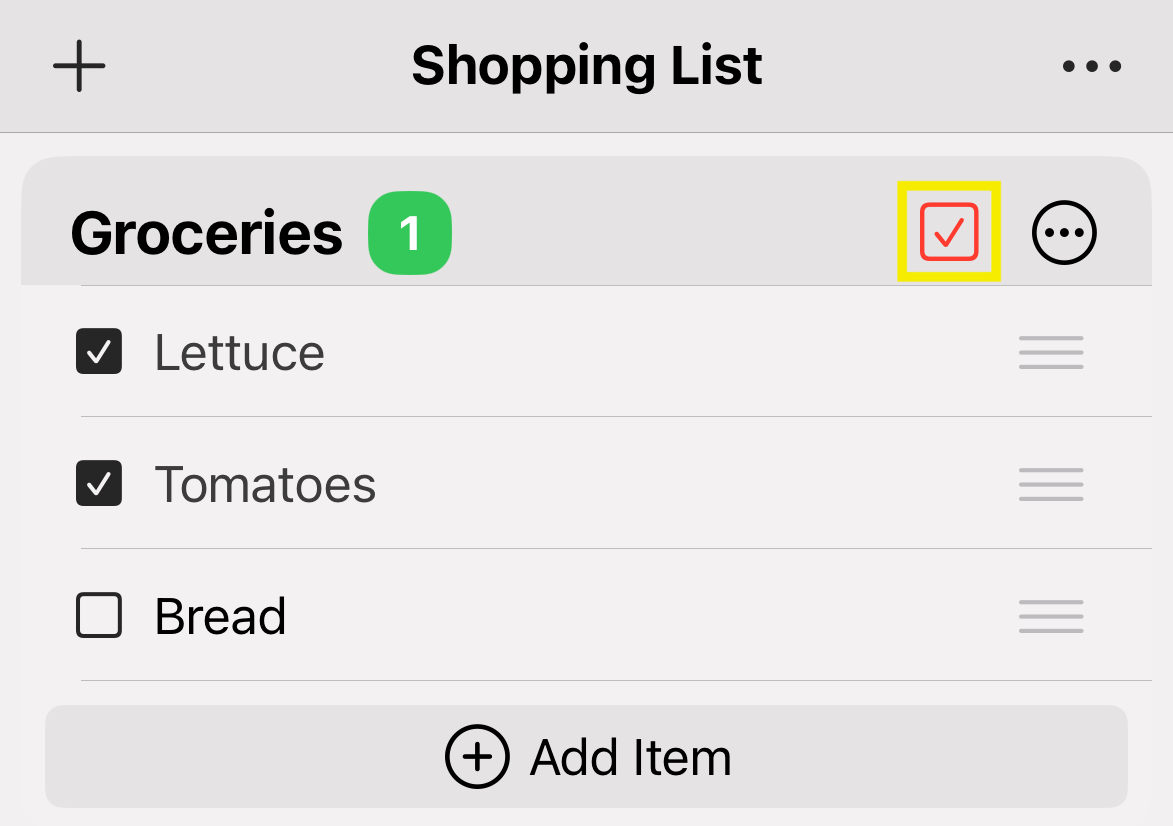
Tap an item to check it, a red remove button will appear at the items section header. Tap it to remove all selected items. Additionally items may be removed from the section headers ellipse button.
There are multiple categories for each rule (see below). More than one rule may be applied for each category (i.e. having 2 or more text rules). Rules may also be re-ordered. Not every combination will yield results. If one set of rules doesn't provide a match, try altering those rules until you receive the desired outcome.
Most rules will allow for a match to 'contain' or 'not contain' whichever value is being applied. Other rules, such as star ratings, and cook times, will allow matching 'or more', 'or less', which will match the current value, then any with more, or less. The last option, 'between', allows matches containing the value and any values between the range given and the values supplied.
Rule categories:
Personal Cookbook provides a way for you to change colors, fonts, and the background image of your cookbook. Themes may be found in the Settings.
Themes may be created with a light style and dark style in a single theme, with independant colors, and text colors, for each style.
Tap and hold a theme, and press 'Edit'. The duplicate option may also be found this way.
To rename a theme, tap title in the top middle of the window.
Each theme may contain 2 colors per style, a primary color, and a secondary color. To copy the primary color to the secondary color, press the 'Primary' button in the Secondary color window, or vice versa. Additionally, the text color of each color, may be set to white, or black.
Linking Colors A light theme color may linked to the dark theme color. This may be done by pressing the link button, next the style selector. This means, that any color changes made to the light version, will be made to the dark version. The dark version will have around half the brightness of the light version. If you wish for the opposite (dark colors affecting the light colors), press the chain button, after switching to the dark color style.
Font sizes can be increased or decreased according to preference.
An image can be applied to the entire cookbook. Optionally, photo filters may be applied, such as: blur, black & white, or sepia.
Themes may be shared and used by others who use Personal Cookbook. Tap and hold a theme, then press 'Share'. The theme file may be opened using the 'Open' option in the Settings.
Try not to use full white or black, and try not to use the same color the primary and secondary color. Double check the text color is readible with it's corresponding background color. If an image is chosen, the secondary color will be used as subtle accents throughout the theme. The theme editor also includes a preview button, where any of your recipes may be viewed while your creating your theme.
Tools for unit conversions, and additional calculations, are provided when editing or viewing a recipe.
You may wish to try the yield conversion feature by tapping on the yield when viewing a recipe, see topic Yield conversions.
Conversion are display from bottom top, with each unit being changed from the left of the value. Conversion scales are located at the top of the converter.
Values are displayed after each entry, with the full equation beneath the current equation.